Guide to Live Revenue Verification on a Website Purchase
Live revenue verification is perhaps the most important part of due diligence when it comes to website acquisitions, as faked, spoofed or inflated revenue is likely the biggest area by far in which websites that are bought and sold today would fail underwriting.
In this ‘field guide’, I’m going to cover the full process of live revenue verification as best as I can, to aid those of my readers who would rather take the DIY approach than outsource this work.
Introduction
So what is live revenue verification and what’s all the fuss about?
Firstly, let me quote something from one of my earlier articles to put things into perspective:
I’ve said it before and I’ll say it again – NEVER trust a screenshot or a video walkthrough, unless the purchase price doesn’t exceed what you’d spend on a dinner. There should be absolutely no exceptions to this rule, ever.
The reason? Because it takes someone with basic computer knowledge no more than 15 minutes to put together a convincing (and I mean convincing – ones that would fool a seasoned expert) package of screenshots and video proofs showing — whatever they want them to show.
I couldn’t stress this enough. Conducting live revenue verification is THE ONLY way to gain some certainty that the business you’re buying is indeed earning what the seller claims.
Now when I say live, I’m not suggesting you travel to possibly the other side of the world to meet the seller (although with larger acquisitions an in-person meeting is indeed advised). Instead, all of this can be conducted remotely, using tools like ScreenLeap or TeamViewer, or even good old Skype.
On the surface, live revenue verification is incredibly simple. All you need to do is arrange a time with the seller where they’ll demonstrate you their revenue accounts over a real-time screen sharing session.
In reality however, there are several pitfalls to be addressed, and those who don’t know any better can STILL fall victim of scams if the process isn’t followed properly. Read on and follow the six steps below to have all of your bases covered!
Step 1: Getting to know the platform
Before diving into the nitty-gritty, it’s important to take some time and try to fully understand how the business that you’re about to acquire operates, especially as this will largely decide the exact structure of the revenue verification session itself.
By saying ‘getting to know the platform’, what I mean primarily is figuring out the exact way that money moves.
This is often very easy, but should never be overlooked as by not having a complete understanding of money movement it’s very easy to miss crucial parts of verification.
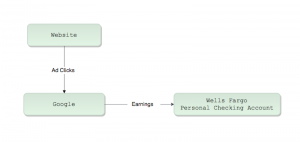
Let me give you a few examples of popular ‘money funnels’. Money movement can be as simple as this for a content site running Google AdSense:
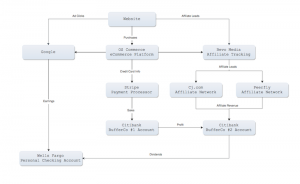
… but it can also be as complex as this, for a site that has multiple revenue sources and is is operated by a series of ‘buffer’ companies:
The reason why it’s so important to get a full understanding of this is because this will allow you to essentially trace the whole ‘cash journey’ (see Step 6 below), reducing your chances of falling victim of faked data.
Understanding how the business you’re about to buy works is in general very important, so don’t be afraid to schedule multiple phone calls with the seller and/or the broker if that’s what it takes to achieve it.
Step 2: The Setup
The second step in the process is choosing the platform for your live verification session. Personally, I prefer ScreenLeap because it’s free, easy to use, lightweight, and doesn’t require much preparation setting up.
If ScreenLeap is your choice then this is where the technical preparation ends for now, and you can go ahead and pencil in a time for your session with the seller. Note though that ScreenLeap doesn’t transmit voice, so you’ll still need to this part over the phone.
Depending on the complexity of the business in question, I always recommend putting aside at least 1-2 hours for the session, as you’d much rather finish earlier than planned than have the call go over the scheduled time or worse, end it early.
The only other thing you need to do at this stage is instruct the seller to set up ScreenLeap prior to the scheduled call, advising them to start the process at least 20 minutes before the call to account for any delays.
This is incredibly simple – the seller just needs to go to http://www.screenleap.com/, click the “Share Your Screen Now” button, and follow the simple on-screen instructions.
Then, the software gives them a 9-digit code, which they’ll need to forward on to you. Once the session starts, you yourself will need to navigate to screenleap.com, enter the 9-digit code and hit “View screen share”. Voila!
Step 3: Catching the bad boys
For those who are technically savvy, this is the easiest part. For the rest – potentially the most difficult one.
What we’re trying to accomplish here is avoid cases where a fraudster demonstrates supposedly ‘live’ revenue accounts, while in reality having spoofed versions of such accounts running on their own computer instead.
If this seems difficult to understand then don’t worry – it’s actually not rocket science at all. But to avoid turning this article into a book, I’ve instead recorded a quick 8-minute video, explaining what’s possible, and how to safeguard yourself against it.
* For Windows, see here for instructions on how to find and open the hosts file mentioned in the video.
If anything was still unclear then feel free to shoot me a message in comments below and I’ll help you out.
Step 4: Verifying aggregate numbers
Once you’ve made sure that there’s nothing funny going on and everything is what it seems, it’s time to dive into the numbers.
In all likelihood, the seller has already provided you with a Profit & Loss Statement of some sort, or at the very least with monthly revenue claims in an email or through some other medium, giving you the starting point for the verifications, i.e. something to compare your findings against.
Your preferences may differ here, but personally I tend to look very closely at the trailing 12 months, comparing the seller’s claims for each of the 12 months to the actual numbers, and then look at the yearly aggregates going back 3 years.
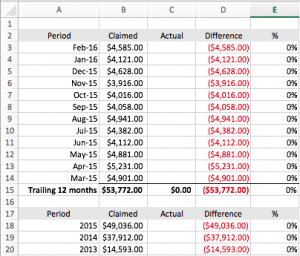
To make things easier and more organised, I tend to insert the seller’s claims into a separate Excel spreadsheet prior to the verification call. Here’s what my template looks like:
All set with the blanket template, I then switch back to Step 1 to determine the primary revenue account*, and proceed to having the seller log on and show me the revenue totals for the periods that I’ve chosen to look at.
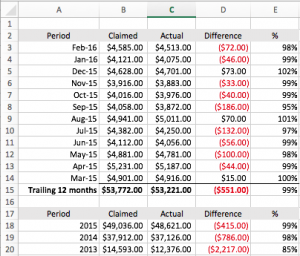
This usually takes no longer than 5-10 minutes, and while the seller is showing me the data, I snap screenshots (with the seller’s permission), as well as type the actual figures into my Excel spreadsheet, having it do the necessary calculations for me in real time. Here’s what it looks like when completed:
As you can see, it’s no rocket science but helps keep things organised, as many people (myself in the past included) tend to scribble their findings on pieces of paper instead, leading to embarrassing situations where data gets lost or corrupted and needs to be re-verified.
Feel free to download my template below and use it as for your own verification sessions:
This gives you an overall idea about the accuracy of the seller’s revenue claims. Needless to say, there’s far more to revenue verification than this, but if after the aggregate check you end up with actuals that are 50% lower than claims then you already know that you’ve got a major problem in your hands and may wish to address it before proceeding any further.
Primary Revenue Account
The Primary Revenue Account needs to be an account that meets these three criteria:
1) It’s operated by a neutral third party, e.g. a bank, a payment processor, a popular advertising agency, etc. This guarantees that the seller isn’t able to manipulate the data that it provides.
2) It deals with actual money movements, rather than being merely a reporting platform that aggregates data from a third party. This helps with the accuracy of data, as we always want to receive data from its actual source.
3) It provides a high level of detail on each transaction processed. This helps us make sure that we’re not looking at hidden revenue, generated through unrelated businesses or activities.
GOOD examples of PRAs are payment processors (PayPal, Stripe, Braintree, etc.), mainstream ad platforms (Google AdSense, Microsoft PubCenter, etc.), affiliate networks (Commission Junction, Peerfly, etc.)
BAD examples of PRAs are Bank Accounts (unless customers pay directly into the bank account), back-ends of self-hosted eCommerce platforms (OSCommerce, WooCommerce, etc.), unknown affiliate networks and ad networks.
BEWARE! Some scammers are so well prepared that they own the claimed “revenue source” (such as an advertising network) themselves and try to pass the statements from this revenue source off as ‘third party revenue proof’. In reality, the advertising network doesn’t exist and no revenue has been generated. This is why you should be extremely careful if the site’s primary revenue source is a company that is largely unknown / doesn’t have many reviews online.
Step 5: Transaction Spot-Check
When you’re done verifying the aggregate numbers, it’s time to get a little more surgical and look at a few random transactions.
The reason we do this is two-fold:
1) In case that our safeguards in Step 3 didn’t work and the platform is in fact spoofed, it’s highly unlikely that the fraudster has managed to spoof it to the extent that it’s capable of showing transaction-level details;
2) An increasingly common issue that I’ve encountered is sellers claiming revenue that in fact originates from another business – e.g. the seller has two sites but only one PayPal account, but represents all of the account’s revenue as the revenue of Site A.
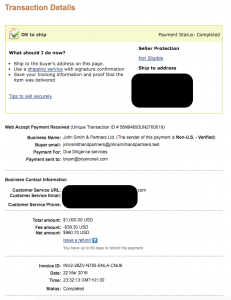
To counter both of these issues, I tend to randomly check a number (usually 5 to begin with and more if there are issues) of transactions, going over them with a fine-tooth comb and making sure that everything is to my liking.
In the image above, it can be clearly seen that:
– The transaction indeed took place;
– The buyer’s name is John Smith & Partners Ltd. (this can be later cross-checked against customer database if necessary);
– The payment description was “Due Diligence Services” (this is important in cases where payment descriptions differ from what the site is actually selling).
It’s very difficult to give you a step-by-step guide for this as there are so many payment processors (and business models!) out there and the process, as well as the level of detail that you can get, differs between them a lot, but in most cases you should be able to get something describing the payment, the client, and the product/service that they’ve paid for.
For this same reason, it’s extremely important to be careful when choosing the primary account to verify, as you want it to have the level of detail necessary, rather than be looking at an aggregate account (e.g. a bank account that only shows deposits from PayPal), where the transactions shown can be anything.
Step 6: Verifying the whole ‘cash journey’
In addition to the spot-checking of transactions done in Step 5, I usually want to end my verification sessions with choosing a certain period (such as a random 10-day period from some point in the last 12 months) and following the whole “cash journey”, making sure that the number is same or similar throughout.
When I say cash journey or money funnel, I’m referring to what we discussed back in Step 1 (see the diagram there).
The reason for this exercise is similar to that of spot-checking transactions – to make sure that there are no discrepancies between multiple accounts / reporting platforms that are all supposedly reporting the same thing.
So for example, if we deal with an ecommerce site that uses the OSCommerce back-end, processes payments via Stripe and PayPal, with money then being deposited to the seller’s current account, you would pick a random period and ask the seller to log on to and show you the total for this period in the following accounts:
1) OSCommerce – take a note of total transaction value
2) Stripe – calculate incoming payments
3) Paypal – calculate incoming payments
4) Bank Account – ask the seller to show deposits from Stripe and PayPal.
Bear in mind though that it’s very rare to see a 100% match between different reporting platforms, and anything above 90% can usually be considered sufficiently accurate.
This is due to a variety of reasons, but primarily because there are differences in when charges are reported (i.e. sale date vs. charged date vs. cleared date), some payment processors tend to deduct their fees already from gross revenue, etc.
Closing Thoughts
I hope this guide was useful and that it will help some of you avoid a potentially bad purchase or – at the very least – make you feel better about a good one.
Needless to say, web businesses can differ from each other in many ways and it’s therefore impossible to come up with one-size-fits-all type of instructions, but the steps that I’ve outlined here will hopefully give you an overall idea of what to look for and how to look for it, on the basis of which you can put together your own plan depending on the exact nature of the business that you’re looking at.
Before signing off I also want to stress that whilst revenue verification is arguably the most important part of due diligence, it’s not even close to the only one – and it’s still very possible to stumble upon a lemon even if revenue checks out 100%.
As an example, in case of ecommerce businesses it’s just as important (but much more difficult) to verify cost of goods than it is to verify revenue – after all what good is a business that generates $5 million a year in revenue, but spends $10 million on purchasing goods for sale, generating a significant net loss?
But we’ll leave all that for another day.
For now, please let me know in comments if you have any questions or if you found the guide useful!

